Showing posts with label Tips and How-Tos. Show all posts

Wednesday, December 7, 2016

RECIPE || Spicy Chilli Con Carne

Hi Guys! Today I'm sharing with you my personal Spicy Chilli Con Carne recipe! I love chilli, and this is the outcome of David and me wanting to put together all the best parts of our families' chilli recipes, as well as other tasty ideas from the internet.

I love how it has turned out, and wanted to share it with you guys in case you're looking for a delicious, spicy, beefy chilli recipe for those cold wintery nights!

Or summer. You do you.

Full ingredient list and instructions below the embedded video, in case you missed anything.

1

Click here to watch in HD, or watch below:

Ingredients:

  • 2 smallish onions
  • 2 pounds ground beef (approximate. I prefer lean or extra lean)
  • 4 jalapeno peppers (or 2 jalapeno & 2 serrano)
  • 4 canned chipotle peppers (mine were small, about 1 inch, if your's are larger, use fewer)
  • 3 bell peppers (I like a mix of red and yellow, but orange or green would also work)
  • 4 or 5 cloves of garlic
  • 1 large can crushed tomatoes (or blend some diced tomatoes)
  • 2 cans red kidney beans
  • chili powder (about 3 tablespoons, adjust to taste)
  • cinnamon (1 or 2 teaspoons, adjust to taste)
  • cocoa powder (1 or 2 teaspoons)
  • cumin (1 or 2 tablespoons)
  • salt (1 tablespoon, or to taste)
  • pepper (1 tablespoon or to taste)
  • oregano (2-2.5 tablespoons, or to taste
  • beef stock (1-2 cups)
  • water (about 2 cups)

Method:

  1. Chop and prep ingredients
  2. sweat onions until translucent and soft
  3. add beef, break down, and cook until just browned
  4. add everything else: peppers, beans, beef stock, water, garlic, tomatoes, and spices. Stir until well mixed, then put on Medium heat to simmer for ~30 min covered.
  5. After 30 minutes, taste and add any additional spices until it tastes just right to you. Remember the flavours will blend better with time, also. Replace lid and allow to simmer for another hour or two, stirring occasionally to prevent burning on the bottom of the pot and around the edges.
  6. Serve with cheese, or whatever you like. I suggest some bread or rolls, and maybe a glass of milk for anyone more sensitive to spicy foods!

Thanks for watching/reading! Let me know if you make this, and if you have recipe suggestions for future posts!

Saturday, May 24, 2014

Video: Perfect Sick Day Makeup | No-Makeup Makeup Tutorial

Hello again, just wanted to share my latest video with you all. I perfected this makeup look the last time I was sick about a month ago. I don’t like to look for feel too made up when I’m feeling sick, because I feel like I’ll just rub my eyes and spread glitter everywhere, but I don’t want to go makeup free, because then I feel even worse, because I know I look as sick as I feel. I think this look strikes a good balance, hiding imperfections and brightening, without being heavy or messy, and having great staying power.

If you’re interested, click here to watch in HD on YouTube, or watch below:

Thanks so much for watching, and please be sure to subscribe, like this video, and comment! Have an awesome weekend!

<3

Sunday, October 23, 2011

Failed attempt: Halloween Gradient Nail

Hey everyone! Today I thought I’d cross off one of my nail designs off my want to try list, and show you guys a step-by-step look at my very first attempt. Unfortunately, I made really bad colour decisions, but this post will still give you an idea of the effects you can achieve with this technique… Why mess up your own nails when you could be learning from my mistakes?

But first, because I like to brag, I want to show off how long my nails have gotten, without any polish covering them up:

IMAG1843IMAG1844

I know they aren’t very long compared to a lot of girls, but this is probably the longest my nails have ever been, and I really have to thank OPI Nail Envy, partly, because it really has helped make my nails much much stronger.

So, anyways, the polishes I’m going to use for this look are Rimmel Lyrca Wear 10 +Minerals in Black Satin, Sephora by OPI in Caliente Coral, and The Face Shop in OR202, and the top coat I’m going to use is Clinique All-in-One Base & Top Coat:

IMAG1860

I started by covering my nails in a coat of the black, and let it dry:

IMAG1850

Next, I painted just the tip in the OPI:

IMAG1853

And then, thinly painted about halfway down my nail with the Face Shop:

IMAG1854

And finally, added one more thin coat of the Face Shop polish about 75% of the way down my nails, so that there is still uncovered black at the base, let dry, and finished it with a top coat. The final product:

IMAG1857

It’s a little messy, but I’m still pretty pleased with the results. I hadn’t seen any videos where someone used black as their base, so I wasn’t entirely sure how well it would work.

Tips:

  • If you’re using black as a base like I did, make sure you don’t spend too long in each coat of colour over top. I did this on both my thumbs, and it results in a weird swirling of the black and colour, as the base colour gets wetter and the two mix.
  • Be sure to let each coat dry before you move on to the next one. This is especially important for the base colour coat, and also for the first layer of your gradient, but should also be kept in mind for every other coat. One of the main issues with my gradient mani was that it took way too long to dry, and I messed it up because the top seemed dry, but it was still wet lower down.
  • I would suggest not using black as a base, or at least not trying to mix orange and black.
  • Try to get nice, even line on every coat, so that it doesn’t end up looking messy, like mine.

Do you like the idea of me posting my failed nail art attempts, as well as my successful ones, so you can learn from them, or should I pretend I’m always awesome for the sake of this blog? Let me know what you think!

Sunday, September 25, 2011

Union Jack Nail Art

This is just a quick post to show you the British flag nail I just did. It’s a bit messy, partly because I don’t have the right tools, and partly because I am planning to get some brushes tomorrow, so I don’t expect these nails to last very long!

I used:

IMAG1660OPI Nail Envy, Fascino #26 (which I call TARDIS blue),
L.A. Colors Art Deco in White, and OPI Keys to my Karma,
and a dotting tool from Sephora.

And this is the finished product, pre-clean up:

IMAG1659

I think it turned out pretty good, considering I was trying to draw a straight line with a dotter, rather than a brush…!

If you would like to see a video tutorial of this look, check out chrissynailart’s video here, which was the video which inspired my version!

Friday, September 23, 2011

My First Attempt at Water Marbling and Tutorial! (and side note on growing my nails)

Sorry, I started writing this post last Saturday night, which is actually when I did and filmed my water marbling video, however, since this was my first time ever making a video, never mind uploading one to YouTube, it took a lot longer and was a lot more work than I was expecting, and ever since I’ve had too much to do to get back to this post. However, it’s here now! Below are my water marbling tutorial video and pictures of the finished manicure! Enjoy!

Alright, so this post is going to be mainly about my first attempt at water marbling, however, I just wanted to talk about some issues I have with my nails, first, as this doesn’t really warrant a separate post. Feel free to skip this chunk of text if you don’t want to hear about my issues with growing my nails long.

One big problem I have is actually just letting my nails grow out. I want to preface this next part by telling you guys that I used to be a nail biter/picker, and although I’ve pretty much gotten over it, anything wrong with my nails realllly bugs me. Anyways, usually, my nails get to a certain point, where they are actually longer than my finger tips, and then they start to chip at the edges, or especially right along the sides, and I either file them way too much, I’ll cut them off, or, if I’m out and have forgotten a nail file, I’ll snag one, and by the end of the day, I’ve lost all my lovely, almost-long nails.

Lately, however, I’ve been doing really well, and most of my nails have got to a really nice length. However, I’ve noticed that with all the polishing and un-polishing, my nails are getting a little dry, and for a few of them, the top layers have started trying to peel off. My thumb nails have always been especially bad for this, but right now, about half of them are trying to peel in two. So, before I start my water marbling, which I want to last a good long time, as long as it turns out well, since I don’t have a nail strengthener (I’m going to buy one tomorrow >_<) I’ve put some Vitamin E cream on my nails. I’m going to let it soak in for a while, and then wash my hands and get started.

I chose the vitamin E cream, is because one of the ingredients in the OPI Nail Envy strengthener, which is the one I want to buy, is vitamin E; it seemed logical.

Water Marbling:

So, I first learned about water marbling on the RedditLaqueristas forum on Reddit, and have since watched tons of videos and read a bunch of blog posts about how to do it, and now I’m ready to try it. If you’ve never tried, here are the main things you want to know first:

  1. Always use filtered or bottled water at room temperature for best results. (For the purpose of this post, I’m using tap water, which lived in my fridge in a bottle for at least 24 hours, and then sat out in a cup over night… I figure that counts as filtered.)
  2. You’ll need something to clean up the water before you pull out your nails. Some suggestions include:
    • an orange stick
    • a toothpick (this is what I’ll be using, as they are cheap and more disposable. And it has a good, fine tip for drawing)
    • a pencil
  3. Its a good idea to tape around your cuticles, so that there will be less clean up to do on your fingers after you’ve dipped them
  4. Have paper towel down to protect your work area. I would also suggest using a disposable cup, or something you don’t care about and will only use for marbling, as I’m not sure how hard it is to get polishes off, say, glasses and mugs. I’ll be using an old Starbucks cup!

The polishes I’m going to use are:

IMAG1581Left to right: Sally Hansen’s Hard as Nails in ‘Platinum’,
OPI ‘Keys to my Karma,’ Sephora by OPI’s ‘Caliente Coral,’
OPI’s ‘Strawberry Margarita,’ and Sephora by OPI’s clear top coat

I apologize for the awkward angle and poor quality, as the only cam I have is on my laptop, but here is my video tutorial (please excuse my account name, I don’t think I can change it. Also, I apologize about the tiny video, I’m trying to fix that, but here this is for now):

And here is the finished manicure:

IMAG1584

IMAG1587IMAG1589    


Pre-clean up. I was really excited about them, so I didn’t even wait to clean up all the (awesome) swirls on my fingers before I took pictures…

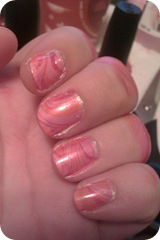


IMAG1592IMAG1590


Some of them turned out better than others, obviously, and they aren’t even nearly perfect, but I think they came out pretty well for my first attempt!


IMAG1594IMAG1595


After clean-up,
looking much tidier.
(not perfect, I know.
I’m not great at clean-up):


And finally, my mess after I was all done:

IMAG1582

So? What do you think? Have you ever tried water marbling, or do you want to now? (If you try it after this post, send me your pictures!!))

Tuesday, September 6, 2011

A note about nail buffers

Nail buffers, in case you don’t know, are kind of like a nail file that you use to take off the top layer of your nails, and make them smooth and shiny. They can be especially useful if you have those little ridges in your nails, and want to get rid of them. (Those ridges, by the way, are usually caused by a a deficiency in your diet.) However, while buffers can be useful for making your nails pretty, there are some things you have to keep in mind when using them, and also, not all buffers are the same.

I have two different types of buffers. One, which I bought myself a couple years ago, has four sides, each of which is one step, and it looks like this:

IMAG1551

The first three sides are like different grades of sandpaper, except much, much gentler, and they work to slowly and gently smooth the nails, and the final step is super smooth, and works to bring up the oils in your nails and make them super shiny!

My other buffer, which my mom bought for me (and one for my sister) last Christmas from Sephora has the same final step to make your nails all glossy, but the first side (there are only 2) is made of a much coarser, metal “honeycomb” shaped file, which almost grinds down the ridges in your nail. It looks like this:

IMAG1553

With both buffers, but especially the coarser one, you have to be really careful not to file away too much of the thickness of your nail, because if you do, they can become very thin and will break or tear very easily. This is something that I had to learn the hard way, when I first bought my 4-step buffer, because I was really obsessive about using it.

Also, the shiner side of these buffers can make your nails look super shiny, exactly as if you had a simple coat of clear polish on, which is great if you want your nails to look pretty and clean, but you can’t wear polish. However, if you do intend to polish them after smoothing the ridges out, then shining them, in my experience actually makes it harder for your polish to stay on the nails. So, if you want to smooth out the nails and wear polish, I would suggest buffing them, but leave out the final step.

Monday, September 5, 2011

Eyebrow Shaping Tips

Okay, so I got a request from one of my friends for a tutorial on how I pluck my eyebrows, since she thinks I have “great eyebrows.” Now, personally, I don’t see anything special about my eyebrows. I sometimes tend to pluck them a little on the thin side, and they are basically gold, and the outside edges tend to disappear in the wrong light, and sometimes when exposed to the strong flash from a camera. However, this friend is not the first one to compliment me on the shape of my eyebrows, and since its seems like such a random feature to compliment, I’m not sure I can really disagree.

Now enough back story, here’s my issue: I’m not entirely sure what to say about plucking one’s eyebrows, as I mostly do it on auto-pilot, and I’ve been doing it so long. So, I’m going to put off doing some sort of tutorial for a while, and just give you some tips that I think are important to keep in mind when plucking and shaping your brows:

  1. ALWAYS keep your natural shape in mind. No matter how much you want a certain shaped brow, if your natural brow shape is completely different, forcing it to follow another shape will not work well, and will do odd things to your face.
  2. For the most part, you should only pluck hairs from below your brow line, please leave the ones above this line alone.
    There is an exception, though; for example, if I get lazy and let my brows go too long without plucking, I get these little hairs just above the outside corner of my brows that really have nothing to do with the over all shape. If you too have these hairs, feel free to remove them, just don’t get too close to the hairs you want to keep.
  3. Be careful when plucking below the outside corners. I used to have a major problem with this, and at one point, the outside corners were basically a line of single hairs. Not a good look.
  4. Find your natural arch. No one wants a straight, thick caterpillar brow like Sandy Cohen from the OC:
    sandycohen

    For me, and for most people,  the arch will be aligned with the outside of your iris (the coloured part of your eye) when you are looking straight ahead.

    IMAG1544I darkened my eyebrows a little bit for this picture to make sure you can really see them, and I think its obvious just it was necessary, since they don’t look darkened.

  5. Personally, I find its much easier to use pointed tweezers than slanted tip ones, since when I try to use slanted ones, I often can’t get a grip on the hairs, or else I end up cutting the end of the hair off, instead of pulling the whole thing out.IMAG1546

    IMAG1547
  6. Finally, make sure you don't make your inner corners too thin, and they certainly shouldn't be pointy. I usually try to make mine look somewhat rounded, and you should aim for a somewhat rounded line. Also, be sure to pluck as much of the tiny little hairs between your eyebrows, even if they aren't very visible, because it gives you a cleaner look.

  7. Try not to use a magnifying mirror for this job. Its a lot easier to go overboard, and think there are a lot more hairs that need to be pulled than there really are if you are looking at yourself in a magnified mirror.

  8. Please be careful that you don't pull out any of the long hairs in your brows, as these are the ones that give your eyebrows their shape. If you pull one, there will be a hole in your eyebrow, and unless you like having to patch up holey eyebrows with pencil, just don’t go there.

I’m sure I haven’t touched on everything, but these are the biggest things that I can think of right now that you should know. Once you’ve plucked your eyebrows into a good shape, its a lot easier to maintain them by plucking out the strays now and then.

Finally, if you mess something up, say you put a hole in one eyebrow, or you pluck way too many hairs, don’t keep pulling. The more you pull out, the longer it will take to fix itself. And you don’t want to super-pluck the other side too, just because you over did it on the first brow. Just put the tweezers down, and walk away, and let the necessary hairs grow back. Its better to have slightly wonky brows, in my opinion, for a week or so, than it is to have super tiny ones for ages.

Sandy picture from here, the rest are my own.

LinkWithin

Related Posts Plugin for WordPress, Blogger...